Showing posts with label Making Coffee. Show all posts

Sunday, February 18, 2018

How to Make Cold Brew Coffee

Advantages of Cold Brew Coffee


Making Cold Brew Coffee in KitchenAid Cold Brew Coffeemaker

Cold brew coffee is all the rage these days.  I have seen jugs of cold brew coffee for sale at the grocery store and have tried several types.  Recently I noticed that the local coffee shop lets you fill a growler with cold brew concentrate and take it home.

So why all the hype about cold brew coffee?

Unlike regular hot brewed coffee, cold brewed coffee is made at low temperature in a refrigerator and uses long exposure to the coffee grounds.  Cold brew coffee might brew for 24 hours in cold water instead of "regular" hot brewed coffee which brews for 5 minutes in hot water.

Cold brew coffee tastes different than "regular" hot brewed coffee, even if you use the exact same coffee grounds to make it.  Cold brew coffee is less acidic and is more mellow.  I like the idea of exploring new coffee experiences with new brewing methods.

Another difference between cold brew coffee and regular coffee is that cold brewing produces concentrated coffee.  Cold brew coffee concentrate is ideal for making iced coffee drinks since it is cold and since melting ice does not water it down in your iced coffee drink.

You can also use concentrated cold brew coffee to make hot coffee.  Just add 1 part cold brew concentrate to 3 parts hot water.

How to Make Cold Brew Coffee

My wife picked up a KitchenAid cold brew coffee maker to make coffee concentrate for her iced coffee drinks.


The first thing I noticed about the cold brew coffee maker is that there is no power cord.  You don't need power to run a cold brew coffee maker.  You put lots of coffee grounds in the filter, fill it with water, and then let the coffee brew at cold temperature for 12 to 24 yours in your refrigerator or on your countertop.

The next think I noticed is that this thing takes a lot of coffee grounds!  The instructions call for 250g of coffee grounds and 1 Liter of cold water.  I ran my coffee grinder a few times to produce the amount of coffee grounds needed.  I made a blend of Bluebird "Extra Chirps" Blend and Cafe Fair Machu Picchu.  This took several runs with my Mr. Coffee simple blade coffee grinder.

The process of making cold brew coffee is pretty simple:
  • Grind some coffee beans, or you can use ground coffee.  
  • Fill the metal filter up to the line with coffee grounds, about 250g.
  • Add 1 L of cold water, pouring it over the coffee grounds in the filter.
  • After the grounds "bloom", add a bit more water- about 1/4 L.
  • Use a spoon to press any dry grounds down into the water.
  • Let it brew for 12 to 24 hours in your refrigerator.
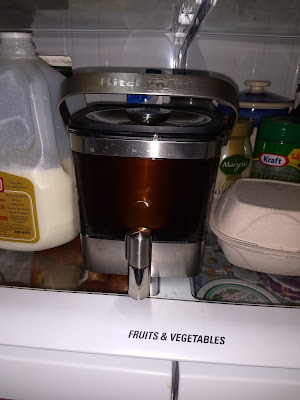

Cold Brew Coffeemaker in Refrigerator

After brewing is complete, carefully lift the filter filled with grounds out of the coffeemaker and dispose of the grounds.  You can lift the filter up part way and tilt it against the side of the opening to let all of the liquid drain out of the filter basket before removing it.


Draining the Cold Brew Filter


Of course you don't need to wait 12 to 24 hours for your coffee to brew every day.  Once you have brewed the cold brew concentrate, you can simply dispense some from your cold brew coffee maker whenever you want coffee.  The KitchenAid cold brew coffeemaker has a handy dispenser on the tank.

I like the idea of being able to brew my own cold brew coffee at home instead of buying it at a store or coffee shop.  For one thing, I can try my own blends of ground coffee.  I can also experiment with different brewing times and temperatures.

If you are looking for a new way to enjoy coffee, give cold brewing a try!


Copyright © 2018 Dr. Penny Pincher. All Rights Reserved. Coffee Maker Journal

Saturday, March 11, 2017

Take Care of Your Coffee Maker!


How to Take Care of Your Coffee Maker and Get Great Tasting Coffee


Rinse and Dry Every Day!

In the bad old days, I was in a rush to get my coffee and go.  I would leave the wet coffee filter filled with wet coffee grounds in my coffee maker to deal with later.  I would empty as much coffee as I could get out of the pot, but I wouldn't bother to rinse it out before hitting the road.

Now, I have learned to take better care of my coffee maker.  I take a few seconds to empty the filter basket and give it a rinse right after making coffee.  I also rinse out the coffee pot.

Why not do these things right away until waiting until later?  A little bit of timely cleaning will reduce unwanted flavors and odors from stale coffee and coffee grounds from making their way into your coffee.

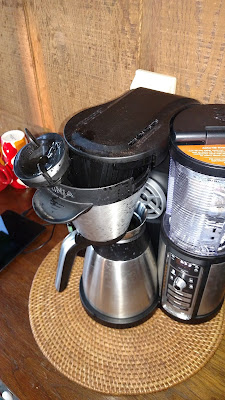
Not only do I rinse the filter basket and coffee pot right after making coffee, but I also store my equipment in a smart way.  I leave the top off of my coffee pot, and I leave my filter basket exposed a bit so it can dry thoroughly.  Here's a photo of how I leave my coffeemaker every day before I leave:


This Coffee Maker is Clean, Dry, and Ready to Make Great Coffee Next Time


See how the carafe has the lid removed and the filter basked is slid out slightly?  This allows everything to dry out quickly to nip algae, fungus, and mold growth in the bud.

Monthly (or Quarterly) Cleaning with Descaling Solution

Another important routine maintenance item for your coffee maker is to clean it with vinegar or descaling solution about once every 1 to 6 months, depending on the harndess of your water.  I once lived in a house where the water was so hard that I had to clean my coffee maker every month, or the water flow rate would significantly decrease due to mineral build-up in the coffee maker.  After a couple months without cleaning, it would take 15 minutes to brew a pot of coffee!

At my current house, I need to clean my coffee maker every 3 months.  Be sure to clean your coffee maker occasionally to remove mineral deposits.  This will shorten your brew time and make your coffee taste better.  Here is my latest article about how to clean your coffee maker.


Copyright © 2017 Dr. Penny Pincher. All Rights Reserved. Coffee Maker Journal


Saturday, March 4, 2017

Ninja Coffeemaker Clean Light: What to Do?


 The "clean" light came on on my Ninja- what should I do?
The "clean" light came on on my Ninja- what should I do?


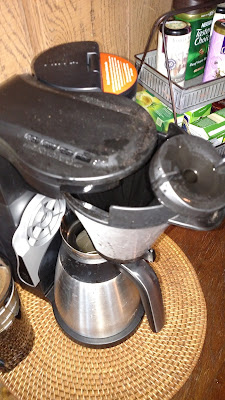
Today the "Clean" light on my Nija coffeemaker came on.  At first I wondered if this meant that my coffeemaker was clean, but I quickly realized that the "Clean" light means that the coffeemaker has a problem and needs to be cleaned.

I went to the Ninja website to find out what to do.  It turns out that the Ninja has a sensor to detect calcium build-up.  That is what makes the clean light turn on.  Calcium deposits can restrict the flow of water in the Ninja and make brewing less effective.

Calcium build-up can form if you are using hard water for brewing.  I used my coffeemaker for about 3 months before the clean light came on for the first time.

So how do you clean your coffeemaker and make the "clean" light turn off?  Fortunately this is pretty easy.  You can run descaling solution or white vinegar through your coffeemaker and this will dissolve calcium deposits.

My grocery store didn't have descaling solution, so I picked up some white vinegar instead.  I filled the reservoir up to the cup line (11 oz), and filled the reservoir with water up to the max clean fill mark (30 oz).

Use White Vinegar of Descaling Solution to Fix the Clean Light on your Ninja Coffeemaker

If you use descaling solution instead of vinegar, follow the directions on the package and fill up to, but not exceeding the Clean Cycle Max Fill line (30 oz).

With the reservoir filled with the vinegar and water mixture, I pressed the "clean" button to run a cleaning cycle.  This is the same one that is lit up when the coffeemaker needs cleaning.

Note: You'll need to set the brew size selection switch to the full pot size before the clean cycle will run.

It takes about 8 minutes to run a clean cycle, heating up the solution and running it through the coffee maker.  At the end of this clean cycle, I was happy to see that the clean light turned off!  I rinsed out the carafe, filter basket, and reservoir since they all smelled like vinegar now.  I also filled the reservoir with water and brewed a cycle with only water to clean out all of the vinegar.

When the Clean light on your Ninja comes on, be sure to run a clean cycle right away with either vinegar or descaling solution.  This will keep your coffeemaker running smoothly.

Copyright © 2017 Dr. Penny Pincher. All Rights Reserved. Coffee Maker Journal


Saturday, April 23, 2016

What Does The Brew Strength Setting Do?

Testing The Brew Strength Selector

What Does the Brew Strength Button Do?
Image Source: Dr. Penny Pincher

The other day, I noticed a button on my coffeemaker that I had not played with: the Brew Strength selector.  I had been brewing coffee for years at "regular" brew strength.  Pushing the Brew Strength button brings up "bold" and "robust" options.  Was I missing out on making better coffee by not turning up the brew strength?

I tried brewing with "bold" and a "robust" brew strength selected.  I noticed that it took longer to brew the coffee, and the resulting coffee was more bitter.  "Bold" brew was a little more bitter and "robust" brew was quite a bit more bitter.

This got me curious enough to find out exactly what the brew strength setting on a coffee maker does.

What Does The Brew Strength Setting Do?


The brew strength selector adjusts how much time it takes to brew a pot of coffee.  The same amount of water is used, but the higher the brew strength, the longer water stays in contact with the coffee grounds.  This does extract more flavor, but not necessarily good flavor.

The good sweet coffee flavors are extracted first.  Longer contact with water results in extraction of more bitter flavors from the coffee grounds.  So turning up the brew strength does change the flavor of coffee, but not in a good way!

Bold Brew Strength Setting
Image Source: Dr. Penny Pincher

I decided to find out how much time the hot water is in contact with the coffee grounds for each brew strength setting.  I got out my flashlight and a stopwatch.  I brewed a 16 oz pot of coffee at each brew strength setting: regular, bold, and robust and timed how long it took to brew.

Here are the results:

Regular Brew Strength
3:46

Bold Brew Strength
5:38

Robust Brew Strength
6:28

The times stated above are in minutes and seconds, for example it took 3 minutes and 46 seconds from the time I started brewing until brewing was complete for 16 oz of water on the regular brew strength setting.

So brewing a "robust" pot of coffee not only makes the coffee bitter, but takes nearly twice as long!

Robust Brew Strength Setting
Image Source: Dr. Penny Pincher

My recommendation is to stick with regular brew strength.  If you want stronger coffee, use more coffee grounds and don't mess with the brew strength setting.

Copyright © 2016 Dr. Penny Pincher. All Rights Reserved. Coffee Maker Journal

Sunday, January 24, 2016

Free Coffee Book Promo Jan 29-30, 2016

Free Coffee Book Offer!

My book Great Coffee: Craft Your Cup of Joy is regularly $2.99, but will be free on Amazon on January 29-30!


"Unfortunately, many people have never experienced great coffee. With the techniques in this book, you can make great, world-class coffee at home for only 60 cents! Learn the characteristics of great coffee and how you can make great coffee every time using inexpensive equipment and simple coffee brewing techniques. Once you have experienced great coffee, you'll never want to go back to mediocre coffee again!"

Not only can you learn how to get better coffee, but you'll save hundreds of dollars every year by making coffee at home...


Get it free January 29-30, 2016!

Copyright © 2016 Dr. Penny Pincher. All Rights Reserved. Coffee Maker Journal

Friday, October 23, 2015

Can Coffee Beans Be Too Fresh?

Freshness Window For Coffee Beans

Are These Coffee Beans Too Fresh?

Many coffee aficionados, including me in my latest book, recommend to get the freshest coffee beans that you can find.  Is this good advice?

For most people, choosing the freshest beans they can find is the right advice.  If you can choose beans that were roasted a week ago vs beans that were roasted two weeks ago- take the freshest ones that were roasted a week ago.

But what if you have a local roaster or can roast your own beans.  Is it possible that beans that are "too fresh" aren't as good?  The answer is yes, you can get beans that are too fresh.  There are discussions on this very topic on these threads at Coffee Geek and Reddit.

After roasting, coffee beans off-gas a lot of CO2 and some CO.  That is why the bags of whole coffee beans have a vent- otherwise the bag would puff up and maybe even pop!  Right after the beans are roasted is when the off-gassing is at a maximum, and grinding the beans speeds up the off-gassing even more.  When the beans are ground, it increases the surface area and breaks the cell walls so gasses come out even faster.

Brewing very fresh beans can result in less flavor than you'll get if you let the beans rest for a few days.  The high amount of gas coming off of the very fresh grounds can prevent flavor extraction.  The flavor can be more watery and "grassy" than it will be after the degassing has settled down.

Coffee beans have a freshness window.  The peak window for most coffee beans is from a few days after roasting out to a few weeks after roasting.

I will still recommend to buy the freshest coffee beans you can find.  Most people are not getting their beans directly from a roaster or roast the beans themselves, so there is no risk of getting very fresh beans that were roasted only a day or two ago.

If you do somehow get beans that are too fresh, you coffee may not taste great for the first couple days.  If you get stale coffee beans, your coffee will never taste great and will only get worse every day.  I'd take the fresh beans every time.

Copyright © 2015 Dr. Penny Pincher. All Rights Reserved. Coffee Maker Journal

Friday, September 4, 2015

A Cheaper Coffee Grinder

When Your Coffee Grinder Breaks...


Mr. Coffee Burr Grinder with Bean Storage

The other day, my coffee grinder failed, and it threw my day into chaos.  I had a nice Mr. Coffee burr grinder with a built-in storage container for the coffee beans.  It had worked well for about 3 years, but something broke and it would no longer grind.  I tried emptying it and cleaning it, but still no luck.  I suspect that one of the safety switches that prevents the grinder from running if everything isn't closed had failed.

The reason losing my coffee grinder was so chaotic is that it happened in the morning, and I didn't have any coffee grounds around.  I thought about trying to crush some coffee beans by putting them in a zip-lock bag and hitting them with a meat tenderizer, but that seemed like a lot of work.


I ended up stopping at a coffee shop on the way to work.  This is so expensive compared with making coffee at home that I rarely do this.  Plus, I can make better coffee at home.  Not to mention that I had to wait about 30 minutes longer than usual to get my coffee.  Chaos!

You can see why getting another coffee grinder was number one on my list of things to do.  Since I was pretty unhappy with my old grinder since it failed on me, I didn't want to get another one just like it.  If fact, I was ready to try something simpler and cheaper.

What I ended up with was also a Mr. Coffee product, but it is a simple blade grinder without a coffee bean dispenser.  The coffee bean dispenser on my old coffee grinder would sometimes get jammed up, so I was ready to try one without built-in bean storage.  I have glass coffee bean jars from my days using a hand grinder years ago, so I already have a good place to store beans.

Simple blade coffee grinder for $17
My Replacement Coffee Grinder: Simple blade coffee grinder for $17

The cost of the cheaper grinder was $17 instead of $35 for the burr grinder.  My main concern with getting a blade grinder is that I worried that the blade would heat up the beans during grinding and damage the flavor.  So far, I have not found this to be a problem.  This model has an adjustable timer based on how much coffee you are grinding.  You just hold the grind button down, and the grinding automatically shuts off after enough time has passed for adequate grinding.

I have tried both light roast Kona and dark roast French Roast with my new coffee grinder, and both taste great with no loss or distortion of flavor from using a blade grinder instead of a burr grinder.


It takes a bit more effort to scoop the coffee beans into the grinder, but this provides an opportunity for me to make custom blends of coffee from different kinds of coffee beans.

One nice feature of the Mr. Coffee blade grinder is that it has a "chamber maid" feature.  Someone had fun naming this...  The dispenser for coffee grounds has some built-in scrapers, and you can twist the housing to easily get all of your coffee grounds to pour out.  Otherwise, you would need to use a brush to remove all of the coffee grounds that stick to the sides of the dispenser cup that holds the grounds.

So far, simpler is better.  I have had no trouble with my new coffee grinder and hope it will last for many years.  I decided that saving $18 and having a simpler piece of equipment was the way to go.

Copyright © 2015 Dr. Penny Pincher. All Rights Reserved. Coffee Maker Journal

Thursday, September 3, 2015

Custom Blend Whole Coffee Beans at Home

Make Your Own Custom Coffee at Home!

I have started blending whole coffee beans at home to create my own blends.  I really like the smokey flavor of dark roast, but I also like the nutty flavor and citrus notes of light roast.  Why not have all of these flavors at once in the same cup of coffee?

I bought a bag of French Roast dark roast whole coffee beans and a bag of Kona Blend light roast whole coffee beans at Target.  They were marked way down to $5.49 for a 12 oz bag, so I decided to give Target's Archer Farms store brand a try.

Dark Roast and Light Roast Coffee Beans to Blend
Image Source: Dr. Penny Pincher

I poured an equal amount of dark roast beans and light roast beans in a bowl and stirred them with a spoon until they were evenly mixed.

Custom Blending Coffee Beans at Home
Image Source: Dr. Penny Pincher


Next, they went into the coffee grinder, 5 scoops to make a 16 oz cup.  Finally, the freshly ground beans went into my Melitta Thermal Coffee Maker's cone filter and I filled the water tank with filtered water from my refrigerator.

The result...  Some of the best coffee I have ever had!  I have been drinking my 50/50 dark-light custom blend for about a week now.

This is an easy thing to try at home.  All it takes is two different kind of coffee beans and a coffee grinder.


Copyright © 2015 Dr. Penny Pincher. All Rights Reserved. Coffee Maker Journal

Sunday, May 3, 2015

Coffee Drippers- Get a Coffee Maker for Under $10

Coffee Makers for Under $10!?

Did you know you can get a coffee maker for under $10 that makes really great coffee?


These are not typical coffee makers.  I am talking about a "coffee dripper".  This is a cone-shaped device that holds a cone filter and coffee grounds.  You put the coffee dripper over a mug and pour hot water over the top to make pour-over coffee.

All you need to make great coffee is a cone filter, coffee grounds and hot water.

For best results, grind fresh whole beans just before brewing.

RSVP Manual Coffee Dripper


RSVP Manual Drip Coffee Filter Cone for Carafes or Thermos

#4 Cone Filter Dripper


  Plastic Filter Cone #4 Large coffee maker (colors may vary)

HAROLD Coffee Dripper, From Holland


  HAROLD Plastic Filter Cone Medium Coffee Maker, Medium, Red

Melitta Coffee Dripper


  Melitta 64008 Red Ready Joe Filter Cone


Collapsible Coffee Dripper- Easy to Take With You


Kuissential SlickDrip - Collapsible Silicone Coffee Dripper, Filter Cone


Copyright © 2015 Dr. Penny Pincher. All Rights Reserved. Coffee Maker Journal
Sunday, February 15, 2015

Biodegradable K-cups: Paper instead of Plastic...

Biodegradable K-cups

I got a tip from a reader about an interesting product- it is a K-cup for Keurig machines, but it is made of a paper coffee filter material instead of a plastic cup like a typical K-cup.  This product is made by the Rogers Family Coffee Company and the brand is San Francisco Bay Gourmet Coffee.  They are currently selling for about 36 cents per cup, which is a pretty good deal for a quality K-cup.
This packaging concept for K-cups is a neat idea for two reasons.  First, it seems like this design would have better potential for flavor extraction since hot water can flow more easily through the coffee grounds.  Reviews of the strong and good flavor of this coffee seem to support this.

Biodegradable K-cups
Biodegradable K-cups- Good Coffee, Less Chemicals

San Francisco Bay OneCup, Fog Chaser, 80 Single Serve Coffees

Second, the paper filter material is biodegradable.  The standard plastic K-cups are made from a plastic that is not recyclable.  This type of plastic is known as #7 plastic which is a mix of various types of plastic.  The paper filter is biodegradable, which means recycling is not a problem.  Plus, some people are concerned about BPA and other chemicals leaching from the plastic cup into the coffee.  With a paper filter, you don't need to worry about this.

Copyright © 2015 Dr. Penny Pincher. All Rights Reserved. Coffee Maker Journal

Saturday, December 27, 2014

Ideal Coffee Temperature for Brewing and Serving Coffee

Ideal Coffee Temperature Experiment

What is the Ideal Temperature for Coffee?

Measuring coffee temperature
Measuring the Ideal Temperature for Coffee
Image Source: Dr. Penny Pincher

Brewing temperature is important for great-tasting coffee.  Brewing at too high temperature can result in scorched tasting coffee.  Brewing at too low temperature can result in weak flavor.

The serving temperature is also important.  Coffee that sits on a burner that is too hot can make good coffee taste scorched.  Coffee that is too cool does not taste as good.

I think almost everyone would agree that temperature is important for brewing and serving coffee- but what is the ideal temperature?


Measuring the Temperature of Great Coffee

I decided to use my Christmas present to find out exactly the ideal brewing and serving temperature for coffee.  My present is a non-contact infrared thermometer.  It has dual lasers to identify the area of measurement and a nice digital display with the precise temperature measurement.  This is a really nice instrument, and as you can imagine I lots of fun measuring the temperature of all kinds of things around the house.


Measuring Coffee Temperature in the Cup at Serving Temperature
Image Source: Dr. Penny Pincher

I used my Melitta thermal coffeemaker as the ideal temperature source.  This coffeemaker makes great coffee, and the reviews emphasize that this coffeemaker is especially good at brewing and serving at the ideal temperature for coffee.


I measured the coffee temperature in the following places:
  1. In the coffee cup, just after pouring
  2. In the thermal pot, just after brewing
  3. In the filter basket, just after brewing
  4. On the surface of the burner
Measuring Brewing Temperature of Coffee- Coffee Grounds in the Filter Basket
Image Source: Dr. Penny Pincher

Ideal Coffee Temperature

Here are the temperature measurements:
The cup of coffee, ready to serve was at 138 F
The coffee in the thermal pot was at 152 F
The grounds in the filter basket were at 158 F
The burner was at 205 F

Note that these temperatures may not match what is shown in the photographs since I made the measurements in the photos later after the coffee has cooled down a bit.  Also, it was difficult to aim the non-contact thermometer correctly and hold my cell phone to take the picture with my other hand at the same time...

So, the ideal brewing temperature for coffee is 158 F / 70 C

The ideal serving temperature is not so clear.  Some people would think 138 F is not hot enough- some restaurants serve coffee at 200 F.  I would say the ideal serving temperature for coffee is a matter of taste.  At 138 F, the coffee is still hot and I can taste a lot of the subtle flavors in the coffee.  The problem with serving at 138 F is you need to drink it pretty fast because it starts to seem cool when it gets much below 138 F.  I think 200 F is too hot- you can't really taste the coffee.

One discovery from making these temperature measurements was that the burner is at over 200 F / 93.3 C.  So, even in the excellent Melitta thermal coffee maker, you might want to pour the coffee from the thermal carafe fairly soon after brewing to avoid scorching it.


I tried leaving coffee in the pot for a few minutes after brewing was complete and noticed that it heated up to 147 F.  It makes sense that the coffee would heat up since it is sitting on a burner at 200 F.  It seems that you can pretty much choose your coffee temperature by controlling how long you leave it on the burner.  Pour it immediately, and the coffee is at 138 F.  Leave it in the carafe and it will heat up, reaching 205 F after perhaps 15 minutes.

I'm going to pick 158 F as my ideal temperature for serving coffee.  Ideally, you could keep the coffee at the ideal brewing temperature and serve it at that temperature.

Copyright © 2014 Dr. Penny Pincher. All Rights Reserved. Coffee Maker Journal

Thursday, August 28, 2014

How to Warm Up Cold Coffee?

Problem: Cold Coffee

Today, I made a great cup of coffee as usual.  I used my coffee grinder to make fresh coffee grounds from whole bean coffee.  I used filtered water, and brewed my coffee in a coffee maker with a cone filter for maximum flavor extraction.  Here are details on how to make a great cup of coffee.

I got distracted in my workshop, and found that I had about 1/4 cup of cold coffee.  I like my coffee hot.  I have tried heating up cold coffee in the microwave, but it tastes terrible.  What can I do to warm up cold coffee without making it taste bad?

Update June 1, 2015:  I tried some further testing of heating up coffee in the microwave- I found that if the coffee is still fresh (less than an hour old) and if you don't microwave it too long that it still tastes OK.  Still, I think adding hot water is the best way to heat up coffee, but briefly microwaving it can work too.

https://twitter.com/Dr_PennyPincher/status/605351211273842689


My coffee got cold- how can I warm it up?
Image Source: Dr. Penny Pincher

Solution: How to Warm Cold Coffee without Making it Taste Bad

When I end up with cold coffee that I want to warm up, I make a sort of "Cafe Americano".  I heat up a small amount of water to boiling, and add the boiling water to the cold coffee.  This does make the coffee a bit weaker, but the flavor is still good, and the coffee is hot again.

Put a small amount of water in a coffee mug

Heat the water in the microwave

Add the hot water to your cold coffee
Image Source: Dr. Penny Pincher

I use an amount of water slightly less than the amount of cold coffee.  For the cold coffee shown in the pictures, I microwaved the water for 1:30 to get it boiling a little, and then poured it into my cold coffee.  It was a little weaker than the original coffee, but still drinkable.  Give this method a try next time you end up with cold coffee that you want to warm up.

Copyright © 2014 by Dr. Penny Pincher.  All Rights Reserved. Coffee Maker Journal

Tuesday, May 27, 2014

Custom Coffee- Blend Your Own Coffee

Make Your Own Custom Coffee Blends

1) Blend Hot Coffee To Make A Custom Coffee Blend

Blend Hot Coffee To Make Your Custom Blend
Image Source: Dr. Penny Pincher

The first time I realized that you could blend hot coffee was years ago at a small coffee shop.  I ordered a large coffee, expecting to get a house blend that was a medium roast.

The barista asked if I wanted a light roast or a dark roast- those were the only options.  I didn't pick one of those choices, instead I said I was looking for a medium roast.

The barista said, "no problem, I can make you one."  She proceeded to fill a cup 1/2 full of light roast and then topped it off with dark roast.  I was a little surprised, but gave it a try and it was pretty good.

The coffee was not really a medium roast, since it contained no medium roast coffee.  It was a mixture of the dark, smokey flavor of a dark roast and the lighter, citrus flavor of a light roast.  This was interesting- as simple as it seems, I never thought to mix hot coffee to make my own blend.

A variation of this is Cafe Americano, which is prepared by blending a shot of espresso with hot water to make a cup of coffee.  Sometimes I get a decaf made this way.  It is always fresh and always good.  Also, you don't have to wait for an entire pot to brew.

Lately, when I get coffee at the coffee shop at work, I make a blend of 3/4 cup of Seattle's Best Level 3 decaf and 1/4 cup of Level 4 which is a dark roast.  At this coffee shop, you pump your own coffee, so it is easy to try different hot coffee blends.

2) Blend Coffee Beans Or Coffee Grounds To Make Your Own Coffee Flavor

Another way to make your own coffee blend is to mix coffee grounds or coffee beans to get the coffee flavor you want.  My Mom blends Butternut coffee grounds with a couple other brands in a certain proportion.  When she lived out of state for a few years, she could not get Butternut at the local stores, so she would buy large quantities of it when she came back to visit.  This was the only way she could keep her blend the same, just how she likes it.

Blend Light Roast, Medium Roast, and Dark Roast Beans to Make Your Custom Coffee Blend
Image Source: Dr. Penny Pincher

Some people like to blend other flavors into their coffee grounds, such as chickory to make New Orleans style coffee.  My sister-in-law likes flavors like hazelnut flavored coffee.  Flavored coffee has flavoring added into the grounds or beans.  To me, flavored coffee tastes like chemicals and is hard to drink at all.  I once gave her a perfectly good bag of expensive coffee grounds because they were butterscotch flavored and I didn't notice this when I bought it.

I blend different coffee beans together sometimes, usually when I only have a few coffee beans left in a bag.  I have made some really good tasting blends.  My favorites are mostly medium roast with some dark roast beans mixed in.

Another popular blend is to mix regular coffee with decaf coffee.  A mix of half regular coffee and half decaf is known as "half caff" coffee.


Blend Coffee Beans or Coffee Grounds to Make a Custom Coffee Blend
Image Source: Dr. Penny Pincher


Recommended Reading
Here is my article on coffee terms- learn more about coffee terms such as Cafe Americano.

Learn about coffee alternatives and coffee substitutes that have less caffeine than coffee.  There are many options for low caffeine or caffeine free coffee beyond decaf or half-caff!

Copyright © 2014 by Dr. Penny Pincher.  All Rights Reserved. Coffee Maker Journal

Saturday, January 25, 2014

Why Does Decaf Coffee Taste Bad?

Why Does Decaf Coffee Taste Bad?

Decaf Coffee- It Doesn't Taste As Good As Regular Coffee!
Image Source: Dr. Penny Pincher


I guess saying that decaf coffee tastes bad is a bit of an overstatement.  I would say decaf coffee is drinkable, but it is not as good as regular coffee.

If you believe the decaf coffee advertising material, you would think decaf should taste like regular coffee.  But it doesn't.  The green coffee beans must be processed to remove most of the caffeine.  This is a very invasive process and changes the flavor- and not for the better.

What Does Decaffeinated Coffee Taste Like?

I drink one 16 oz cup of regular coffee brewed from fresh ground coffee beans every morning, and then switch to decaf.  I drink several cups of decaf every day.  Usually a couple of Keurig k-cups of decaf varieties such as Dark Magic, Tully's, Newman's Own or Donut Shop.  It is not fair to compare coffee brewed from fresh ground beans with Keurig coffee- fresh ground beans make better coffee.  It is also not fair to compare regular coffee to decaf coffee- regular coffee tastes better.

Keurig k-cup decaf coffee
Image Source: Dr. Penny Pincher


I also buy ground decaf coffee or whole bean decaf coffee to brew at home.  This makes for a fairer comparison between regular and decaf coffee.  Regular coffee tastes better, even comparing similar roasts and coffee preparation methods.  Regular coffee has a richer, fuller flavor.  Decaf has more of a burned flavor and is missing some of the complex flavor of regular coffee.  It's sort of like the difference between listening to music in stereo, and then listening to the same song in mono.  Both sound similar, but the one in stereo is much more satisfying.  Why does regular coffee taste better since you can't taste caffeine?

Why Does Decaf Coffee Have Less Flavor?

The process of removing caffeine also impacts the flavor of coffee.  When coffee is decaffeinated, green coffee beans are processed to extract most of the caffeine.  In the old days, chemical solvents were used.  Some of these solvents were toxic and these are not commonly used anymore.  The two common methods of coffee decaffeination today are:

  • Water Extraction: Hot water is used to extract caffeine, but also extracts flavor compounds.  Water containing flavor compounds is used to try to replace the flavor in the "Swiss Water Process".
  • Supercritical Fluid CO2 Extraction: Carbon Dioxide is used at controlled temperature and pressure to penetrate the green coffee beans and dissolve the caffeine so that it can be extracted.
I think the flavor of decaf coffee is negatively impacted by the processing needed to remove most of the caffeine.  There is potential for a variety of coffee trees to be grown that produce decaf coffee beans with no processing required to remove caffeine.  This could be accomplished through finding coffee plants with a natural mutation, or through genetically modified coffee plants that have the chemical pathway to produce caffeine disrupted.

Wouldn't It Be Great If You Could Grow Decaf Coffee?
Image Source: Dr. Penny Pincher

How to Get the Best Decaf Coffee Possible

Given the shortcomings of decaf coffee due to the processing required to remove most of the caffeine, what can you do to get the best possible cup of decaf?  Follow the same principles that are used to make a great cup of regular coffee:


Copyright © 2014 by Dr. Penny Pincher.  All Rights Reserved. Coffee Maker Journal

Wednesday, January 22, 2014

No More Coffee Beans at Walmart!?

No More Coffee Beans at Walmart?

No More Coffee Beans at Walmart?
Image Source: Dr. Penny Pincher

My wife buys my coffee beans for me when she buys groceries most of the time.  She know my favorite kinds.  I like dark roast Starbucks from Walmart or City Kid from Target.  I have made coffee from whole beans for over 15 years now, and am on my 3rd coffee grinder.  Grinding fresh coffee beans just before brewing means you'll get a fresh cup of coffee with great coffee flavor.

I came home from work to learn from my wife that Walmart did not have and coffee beans for sale.  They had removed their bulk dispensers and did not have any prepackaged whole beans either.  What's up with that!

Is Keurig Replacing Whole Beans?

Are Keurig k-cups replacing whole coffee beans?
Image Source: Dr. Penny Pincher

My first thought is the Keurig k-cups may be replacing whole coffee beans.  There is more profit to be made selling k-cups than selling whole beans.  If you figure out how much ground coffee is in a k-cup and how much it sells for, you'll see the opportunity for profit.  It takes a lot of shelf space to offer lots of different kinds of coffee beans, and the bulk coffee bean dispensers also take a lot of room.  Walmart must have concluded that they could make more money from that shelf space by selling something else.

Do People Have Time for Great Coffee Anymore?

Consumer demand must also be a factor in Walmart's move to stop selling whole coffee beans.  Walmart must not be concerned that people will shop elsewhere to be able to buy whole coffee beans.  This is probably a reasonable conclusion.  The grocery bill is significantly lower at Walmart, so the hassle of picking up coffee beans at another store is not that big of a deal.

Do people have time for great coffee anymore?
Image Source: Dr. Penny Pincher

Perhaps not that many people grind coffee beans at home these days.  There is a Keurig machine at my office, and it is very convenient.  I would say the coffee quality is good, but not great.  Keurig coffee is a step below what I can make at home from fresh ground beans, or what you can get in a coffee shop.  But convenience is important to most people:

  • You can just pop a k-cup in your Keurig and get coffee in about 1 minute
  • You can try different roasts and flavors easily
  • You never have to see or touch a used coffee filter
  • There are no coffee grounds to store, measure, clean-up, etc.

There are certainly advantages to Keurig, but I'm staying with my coffee beans.  Here's how I use whole coffee beans to make great coffee at home every day.

Update:  I checked Walmart today and found that they have a small set of coffee bean dispensers (9 varieties) and a few bags of whole coffee beans available.  So you can find coffee beans at Walmart just not much selection.  Times are changing in the coffee world.  I will shop where I can get whole beans or order online!  It is surprising that whole bean coffee is not popular enough to merit much shelf space.

Walmart has only a few whole bean coffee choices
Image source: Dr. Penny Pincher


Copyright © 2014 by Dr. Penny Pincher.  All Rights Reserved. Coffee Maker Journal

Saturday, July 20, 2013

Coffee Maker Cleaner: Should You Clean your Coffee Maker with Vinegar?

Why You Need to Clean Your Coffee Maker


Should you clean your coffee maker with vinegar?
Image Source: Dr. Penny Pincher

When I talk about cleaning your coffee maker, I am talking about cleaning the INSIDE of your coffee maker. Water carries dissolved minerals that are deposited inside your coffee maker. When the water evaporates from liquid into steam, it leaves mineral deposits inside your coffee maker. These deposits of lime, calcium, and other minerals result in slower water flow through your coffee maker. Some effects of mineral deposits inside your coffee maker:
  • It takes longer to make coffee. A coffee maker with severe mineral deposits can take more than twice as long to make a pot of coffee.
  • It can affect the taste of your coffee. One side effect of slower brewing can be that the coffee starts to become stale before you drink it, especially if it is sitting on a burner
  • Your coffee maker can stop working due to excessive mineral deposits. The flow of water through your coffee maker can slow to a trickle and even stop completely. You will not longer be able to make coffee!

How Often Should You Clean Your Coffee Maker?

How often you need to clean your coffee maker depends on the hardness of the water that you use to make coffee. In my area, the water is hard- meaning it carries a lot of dissolved minerals. Even though my house has a water softener to remove some of the minerals, it still affects my coffee maker after about 1 month of brewing 1 pot of coffee per day.
If the water is not hard in your area, and you only brew one pot of coffee per day, you may be able to go 2 or 3 months between cleanings. If your water is hard and you brew more than one pot of coffee per day, you may need to clean your coffee maker more than once per month.

Should You Clean a Coffee Maker with Vinegar?

Vinegar contains an acid- acetic acid. The acid in vinegar allows it to dissolve minerals readily. Vinegar is also edible, although it has a sour taste and strong acidic smell. These characteristic- being acidic and edible- make vinegar a good coffee maker cleaner. Many coffee maker manuals suggest using vinegar to clean coffee makers.

Large bottle of vinegar
Vinegar for cleaning coffee makers
Image Source: Dr. Penny Pincher

However, the strong odor and taste of vinegar are factors that make it undesirable to use as a coffee maker cleaner. My wife can tell from anywhere in the house when I start cleaning the coffee maker with vinegar! It also leaves the taste of vinegar behind- you should run 2 pots of water through your coffee maker after cleaning it with vinegar to remove the vinegar taste so it won't taint you coffee.

What is the Best Coffee Maker Cleaner?

If you don't like the odor and taste of vinegar, there are other options. You can buy coffee maker cleaners that contain acid other than acetic acid. A common type is coffee maker cleaner that uses sulfamic acid. This is available in liquid form or in power form that you mix with water.

Dip-it liquid coffee maker cleaner- no bad smell!
Image Source: Dr. Penny Pincher
I tried a brand of sulfamic acid coffee maker cleaner called "dip-it". I found that it worked as well as vinegar, but without the bad smell and taste. dip-it costs about $3.50 for a 7 oz bottle of liquid that can clean your coffee maker twice.
After running 5 cups of water with 1/2 a bottle (3.5 oz) of dip-it through your coffee maker, rinse by brewing 2 pots of cold water only and you are ready to make coffee again.


You can also get the powder form of sulfamic acid in a brand called Mr. Coffee Coffeemaker Cleaner. You mix the power with water and run the mixture though your coffee maker in the same way as when brewing coffee. A box of Mr. Coffee Coffeemaker Cleaner contains 2 packets of powder- enough to clean your coffee maker twice.

Mr. Coffee coffee maker cleaner powder
Image Source: Dr. Penny Pincher

As with vinegar and the dip-it liquid coffee maker cleaner, you'll need to rinse your coffee maker by brewing cold water only twice before making coffee.

Coffee Maker Cleaner can Fix a Broken Coffee Maker!

After 8 months of making great coffee with my Melitta coffee maker, the coffee maker suddenly stopped working. It produced only steam. Almost no hot water reached the brew basket, so I got no coffee. Believe me, it was a rough start to the day! Here's a description of how I survived making coffee with a broken coffee maker for a few days. This method of making coffee also works in a power outage with no electricity.
I assumed the failure was caused by a clogged or stuck check valve in the tube from the reservoir to the heating element. I contacted Melitta customer service with a description of the problem. I expected them to have me send the unit in for repair, or even replace the unit since it was still under a 1 year warranty.
The response from Melitta came back on the next business day. They recommended cleaning the coffee maker with vinegar. I had been cleaning my coffee maker with vinegar every month or two. I think it had been even more than two months since I cleaned it when it stopped working. Our water is hard and has lots of mineral content. But I was skeptical that deposits would cause the coffee maker to suddenly stop working.
I decided a vinegar treatment was worth a try. I filled the reservoir with white vinegar, 4% concentration, and turned the coffee maker on. At first just steam came out the top, but eventually there was a slow drip of vinegar into the pot. It took about 90 minutes to run the first tank of vinegar through. I picked up some stronger vinegar- 5% concentration. This went through in about 10 minutes! I ran one more tank of vinegar to get it really clean. I was back in business.
I didn't realize how important it is to clean your coffee maker regularly. I'm going to clean my coffee maker once a month to prevent this from happening again. I'll clean it on the first of every month so I don't forget.

Coffee Maker Cleaner Recommendations

  • Clean your coffee maker with coffee maker cleaner once a month
  • Use either vinegar or a sulfamic acid product
  • Vinegar is cheap and effective, but smells horrible when you heat it in your coffee maker
  • Use a coffee maker cleaner with sulfamic acid such as dip-it or Mr. Coffee Coffeemaker Cleaner if the smell of vinegar bothers you
  • Coffee maker cleaner such as dip-it or Mr. Coffee Coffeemaker Cleaner takes up a lot less room in your pantry than a large bottle of vinegar


Recommended Reading:

Copyright © 2013 Dr. Penny Pincher. All Rights Reserved. Coffee Maker Journal

Recent Coffee Maker Journal Posts